Once you have selected your campaign audience and decided how to split your audience into action groups, your next task is to add an action step to determine what to do with each group of contacts.
Action steps are associated with the color red, both in the menu and on the workspace.
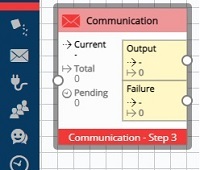
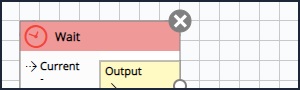
Note: to remove a step from a campaign, select the red X icon in the corner of the step.
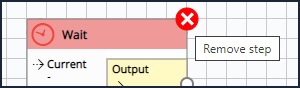
If the icon is grayed out, there is campaign history associated with the step that is preventing the step from being deleted.
The available action steps are:
- Add a seed list to combine audience data with seed data.
- Send your audience a communication, e.g. SMS notification.
- Dedupe records in your audience with shared values, e.g. to avoid sending multiple communications to the same household.
- Take action based an individual's response to a communication, e.g. add an individual that unsubscribes to a do not contact list.
- Make a group wait between campaign steps, e.g. add a delay between communications.
- Merge groups that took separate campaign branches.
- Assign a portion of your audience to a control group.
- Tag your audience for future reference.
- Send individuals to a linked campaign.
- Add a volume limit on the number of individuals that can pass through a step.
- Exit individuals from the campaign.
Campaign seeds (seed list)
A seed list contains a person, or people, who should be included in a campaign even though they do not match the campaign audience criteria. You must configure a seed list before it becomes available to your campaigns.
-
Connect a seed list to your campaign.
-
In the properties pane, choose between internal and external seeds as required.
-
For internal seeds, define the type and size.
For external seeds, select the appropriate source from the seed list dropdown.
-
Run the campaign to populate the counts.
Communication
The communication step allows you to export selected individuals to a communication channel, e.g. Confirmit, Facebook, etc., and send them a communication, e.g. email, targeted ad, etc.
Note: communication steps require a channel and a field list. Contact your system administrator if you need these configured.
-
Connect a communication step to your campaign.
-
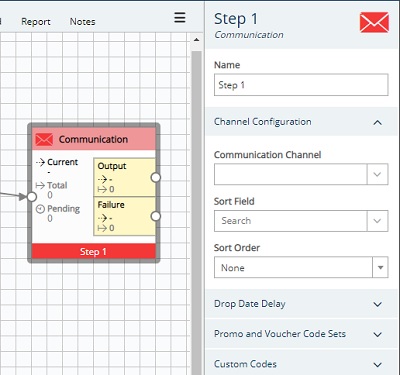
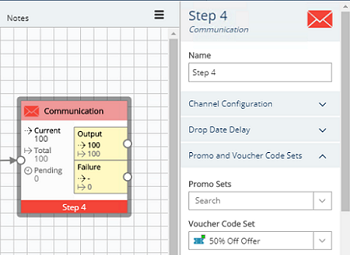
In the properties pane, select your communication channel, e.g. select your ESP channel if the communication step selects individuals for receiving an email.
-
Upon selecting a channel, you will be presented with additional fields. Different communication channels have different details, e.g. an FTP output will require you to provide a file name, define field lists, and add an emergency stop limit.
-
Select a sort field from the dropdown list.
-
Select a sort order from the dropdown list.
-
If you need to attach a voucher code, select from a list of your voucher code sets using the dropdown in the properties pane.
-
Optional: in the properties pane, set a sending timeout to automatically move a lead to the next step if no send or failure response is received.
Note: if using BlueVenn's integrated email communication tool, i.e. the SendGrid channel, you can optimize/localize your communication's delivery.
Audience dedupe
Use the dedupe step to select and remove excess records, based on if there are any shared values.
-
Connect a dedupe step to your campaign.
-
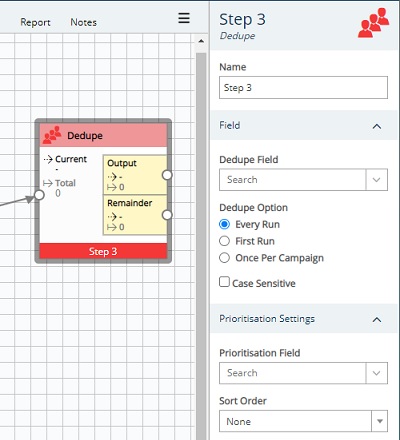
In the properties pane, select the field to use for deduplication.
-
Select how often you want to run the deduplication.
-
Check the case sensitive checkbox if required.
-
Connect the output node to your next action step.
When you run the campaign, the first record to contain each value will continue. Any further records will be suppressed (placed on the remainder node). How you handle the suppressed records depends on the structure of your campaign.
Example: single-run campaign

When you exit your deduped records they are free to re-enter your campaign. This is not an issue for a single-run campaign. For a multi-run campaign where a deduped field is sent an email, exiting the remainder could result in multiple sends.
Example: multi-run campaign with exit

On the first run of a daily campaign where records with a transaction in the past five days are deduped, sent a communication, held on a response node, then moved to a further action depending on the response, the dedupe node identifies 599 duplicate records and exits them from the campaign.
On the second run, the 599 records exited during the first run meet the audience selection criteria and reenter the campaign. The dedupe step now identifies 506 of the returning records as unique and sends another communication, despite having sent a communication to these duplicate records in the first run.
Example: multi-run campaign with wait and manage
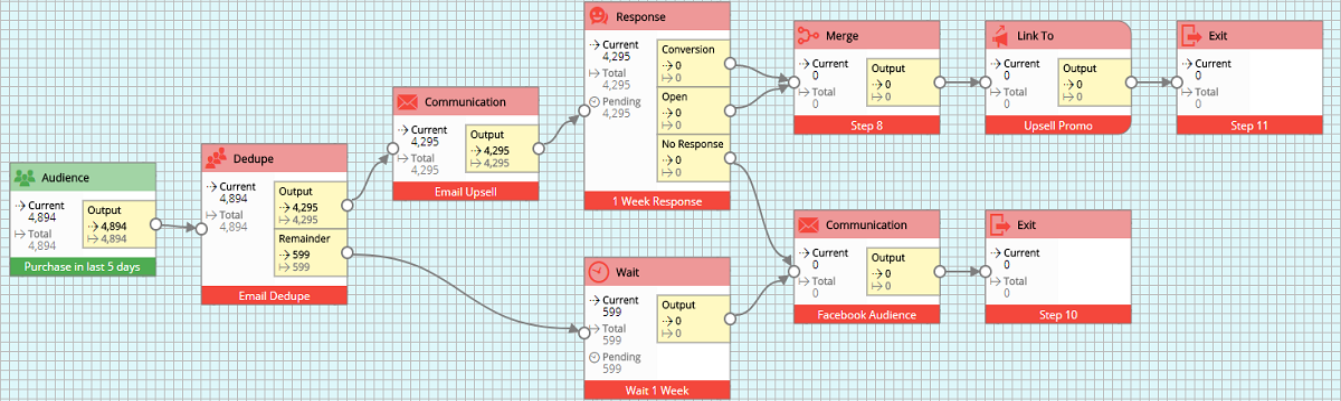
On the first run of a daily campaign where records with a transaction in the past five days are deduped, sent a communication, held on a response node, then moved to a further action depending on the response, the dedupe node identifies 599 duplicate records and moves them to a wait step set to seven days.
On the second run, the 599 duplicate records are still on the wait step, preventing them from reentering the campaign. This continues to be the case for subsequent runs as the duration of the wait steps exceeds the five day requirement for audience selection, ensuring that records are no longer eligible for audience selection prior to moving through the campaign.
Campaign responses
The response step allows you to:
-
Hold a recipient on the response step and wait for a given response type, e.g. hold a person who opens but does not convert to give them time to convert before deciding how they will move through the campaign.
-
Branch a campaign path depending on a recipients response to a communication.
Initially, only the no response branch is enabled. The response properties window lets you select other options, e.g. open, click, etc., and assign wait durations.

Note: logically, for a click to occur, you must first have an open response. However, the nature of some ESP response tracking may result in a click being recorded without it being recorded as open. To ensure you capture events correctly, your query should include all relevant response types, e.g. if seeking to capture both open and click events, query for both open and click events.
Response step best practice - assigning wait periods
When deciding the wait periods for each node of a response step, you should consider the hierarchy of responses and the refresh schedule of your campaign. Leads will typically enter the response step on the no response node and progress to other nodes during a refresh.
Example: a campaign with nodes for no response, opens, clicks, conversions, bounces, and complaints.

Typically, you would assign wait periods to each step such that each step has a shorter wait period than the lower repsonse category, e.g. a recipient:
-
who does nothing will be held for 5 days and then sent a reminder email on the next campaign refresh.
-
who opens but does not click will be held for 2 days (they might come back and convert later that same day) and then sent a reminder email on the next campaign refresh.
-
who clicks but does not convert will be held for 1 day (they might come back and convert later that same day) and then sent a reminder email on the next campaign refresh.
-
who converts, e.g. renews their subscription, will go to the next communication step, e.g. to be sent a thank you message, on the next campaign refresh (i.e. no wait period).
-
who marks your message as spam will have their details sent to a file so that you can update your do not call data.
-
whose email hard bounces will have their details sent to a file so that you can update your do not call data.
Note: recipients stay on the response step until all wait periods have elapsed, e.g. if you run the above campaign and a recipient:
-
does nothing for 3 days, that person will stay on the no response node.
-
goes on to convert on day 3, they will move to the conversion node and get the thank you message the next time the campaign is refreshed.
-
clicks but doesn't convert on day 3, they will move to the click node and be held on the click node for 1 day. If they go on to convert during that wait period, they will move to the conversion node on the next refresh. If not, they will exit the response step via the click node.
In addition, how you schedule your campaign refreshes will impact your response node movements.
Caution: If you assign wait periods such that, for example, a click response has a longer wait duration than a no response node, you will likely have leads pass through the no response node before clicking and be unable to move to the click response node. For this reason, your no response node should always have the longest wait period of the response step.
Response step best practice - campaign refreshes
When refreshing your campaign, you should consider the hierarchy of responses and the wait periods for each node of a response step. Leads will typically enter the response step on the no response node and progress to other nodes during a refresh.
Example: a campaign with:
-
A no response node with a 3 day wait period,
-
An open response node with a 1 day wait period,
-
A convert response node with no wait period,
-
And a refresh every 24 hours,
Would move leads that have opened or converted to their respective nodes after the first 24 hours but leave leads that have yet to respond on the no response step.
The second refresh would re-categorize leads again, moving people who responded on the second day to their respective nodes and exiting those on the convert node from the response step. The third refresh would result in any leads that have yet to respond to exit the no response step.
Caution: if the wait time has elapsed, Engage will begin moving leads from the response step to the next step in your campaign, i.e. in the above example, the refresh after 72 hours would simultaneously move leads off the no response step and check for responses during day 3. This could result in a conversion on day 3 being exited from the response step as a no response before it has been re-categorized as a conversion.
Tip: To allow leads to move to the appropriate node based on their response condition, you should refresh your campaign before the no response node period elapses, e.g. refresh after 71 hours for a no response node with a 3 day wait period. Alternatively, use Engage's scheduling tool to refresh a campaign based on responses received.
Wait steps
The wait step holds individuals for a specific amount of time or until a specified date, rather than waiting until an action occurs, e.g. delay records before moving them to the next step to align an instant communication, such as email, with a communication that requires preparation, such as sending physical media or scheduling a call.

Data merge
The merge step combines multiple streams of data in the campaign process.

Note: the merge step is a visual aid designed to improve readability. A campaign that merges two audiences into a communication would run the same if both audiences were input directly into the communication step.
Control step
When running campaigns, you may want to restrict the communication by applying control groups to your campaigns with the intention to measure their engagement. This can become good grounds to measure the effectiveness of a campaign against people who would have purchased your product regardless.
To build and compare a control group:
-
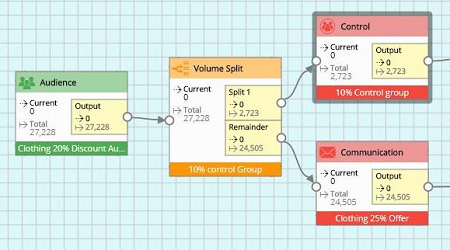
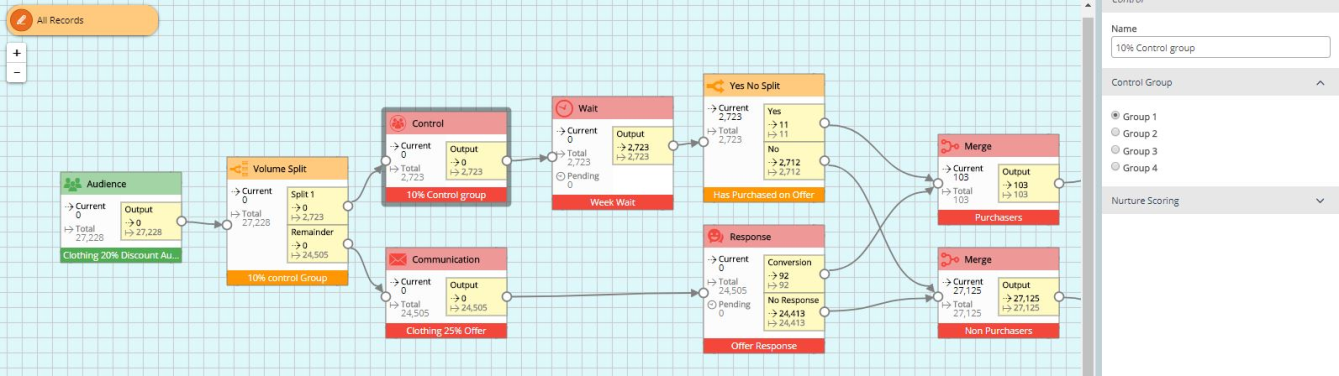
Split your data (typically 10% for a control group).
-
Connect a control step to your split data, you can chose one of four control groups, allowing you to run four different control clusters simultaneously on each campaign.
-
Link your control group back into your campaign data, e.g. by using a yes/no split on if an individual made a transaction and then merging each path with their equivalent campaign response.
-
Conduct your post-campaign analysis, using your control group selections to view campaign history.
Data tags
The tag step lets you flag a group of records for future retrieval.

Note: tags are not the same as saved selections.
-
A saved selection is the rule(s) used to identify a group records, i.e. if your data changes, so will the records.
-
A tag is a snapshot of records at a certain time, i.e. a group of records with a certain tag will remain in that group even if the source data changes.
Link to another campaign
With campaign links you can push and pull data across two separate campaigns. This helps to streamline and intertwine multiple campaigns, and is the first stage in developing a full platform customer journey.
-
Open the campaign that will create your audience, e.g. a campaign that separates individuals that click a link in a promotional email from those who respond to a reminder email.
-
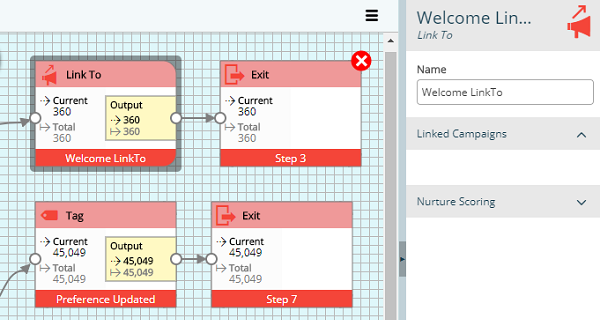
Add a link to step as an action for the selected individuals.
-
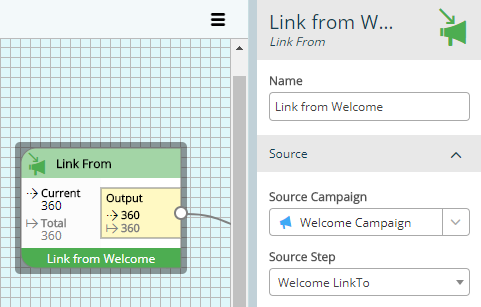
Open the campaign that will use the linked individuals and insert a link from audience step.
-
With the audience step selected, use the source campaign and source step dropdowns to select the campaign and step that contains your linked individuals.
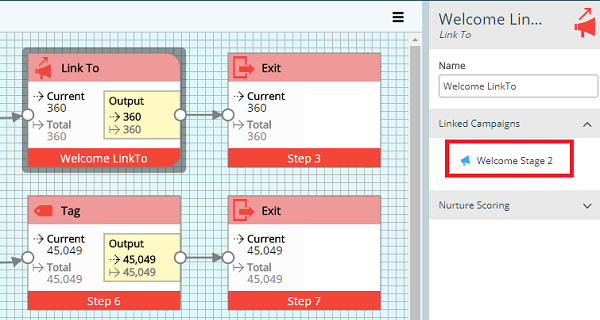
Note: you can confirm the link is working by returning to the original link to step. In the properties pane, under linked campaigns, you should see the name of the second campaign.
Volume limit (campaign throttling)
The volume limit step allows you to impose a cap on the number of individuals that can pass to the next action, e.g. limit the number of people receiving printed material to the available stock quantity.
-
Connect a volume limit step to your campaign.
-
In the properties pane, decide if you wish to have the audience reprocessed on next run or output any remaining individuals to a remainder node.
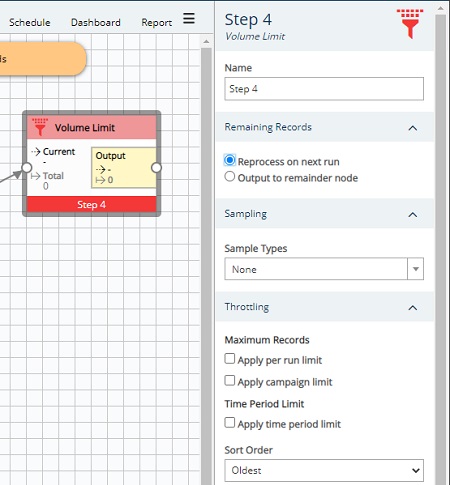
-
If you are using sampling, select a sample type.
-
Choose your method of throttling.
-
Use an apply per run limit when you want to allow additional individuals through the step during every campaign run, e.g. to drip feed promotion codes.
-
Use an apply campaign limit when there is a finite amount of allocation for the campaign, e.g. a limited quantity of free gifts for distribution.
-
Use an apply time period limit to drip feed individuals to the next step e.g. to limit the number of communications being made each hour.
-
-
Set a sort order. The sort order defaults to oldest, meaning that the oldest records in the campaign will pass through the step first when re-running the campaign, preventing records getting stuck if the number of individuals entering the step each run exceeds the volume limit.
Note: if outputting to a remainder, a second output step will be made available to move excess records to another branch of the campaign.
Example: you need to limit a campaign to pass a maximum of 1000 records to a communication step every 30 minutes.
Option 1 - apply a time period limit with a 1000 record limit and a period duration of 29 minutes then schedule your campaign to run every 30 minutes. The time period limit being less than 30 minutes allows for the volume limit step to complete before the next run begins.
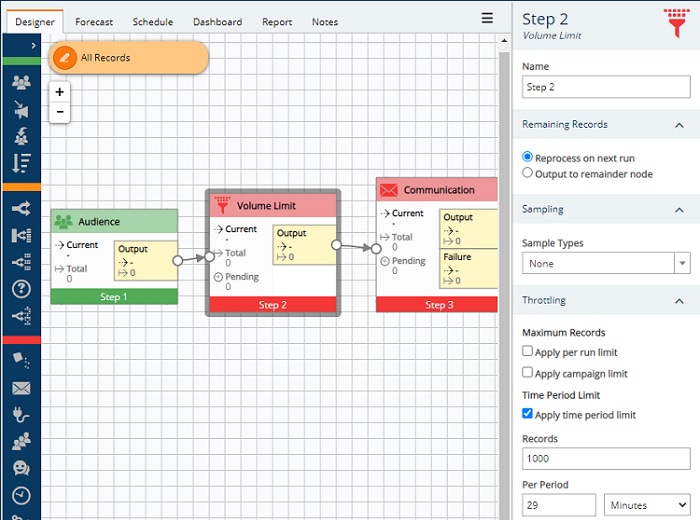
Option 2 - Since there are no other steps requiring a more frequent campaign run, e.g. a step with a 20 minute refresh requirement, set an apply per run limit of 1000 records and schedule the campaign to run every 30 minutes.
Exit Campaign
The exit step lets candidates leave the campaign once they have been processed.

Note: exiting a campaign allows individuals to reenter the campaign.
-
For a birthday campaign, you would want candidates to be included every year so you would have an exit step.
-
In a welcome campaign, you want new members to be contacted just once so you would not have an exit step.
When exiting individuals from a campaign, take into consideration your audience requirements and add steps, where necessary, to ensure individuals reenter the campaign at the correct time, e.g. use a wait step to hold an individual for eight days prior to exiting to ensure they no longer meet the requirements for a seven day transaction window in the audience requirements.